Showing posts with label inks. Show all posts

Tuesday, August 17, 2010

Playful Paper Backgrounds Is Available

My DVD is now available. (I know some of you know that already, but here it is, the official announcement!)

There is a ton of great information on this DVD. Here's what is covered:
Watercolor. A good discussion on the basic palette, colors you might choose to extend your palette and mixing colors. Also, of courses, RESISTS (man, I love those resists). 
Ink. My two most favorite Japanese ink techniques, suminagashi and orizomegami. This is a orizomegami technique below. The suminagashi technique is shown in the clip here from the video (scroll down the page). 

Stamp carving. Now, I decided that there is a TON of info out there on actually carving stamps but what do you do once you have your carving tools and Mastercarve? So I spent more time discussing finding and collecting inspiration and drawing and transferring your drawings to the Mastercarve. The ABC's of carving are there as well, of course.

And finally, Paste Paper. My simple technique will allow you to quickly mix up your paste and color it and get you to the making of the paste paper. Kitchen-table paste paper with excellent results and a bevy of ideas for mark making.

I'm pleased with the results of this first DVD. It is available either as a download to your computer or as a DVD. You can click on the links over there ------> to order. 

Woohoo. Do they have an Academy Award for "Best Instructional DVD"? Well, ok, maybe not; but there are some vintage Diana-isms in there which may be good for a few guffaws to lighten things up along the way. And, of course, I was wearing my fav outfit and had my nails done.


Wednesday, June 16, 2010

Sumi Smoosh Tutorial

Wooooo ! It's time for the Tute Tsunami with Art Sparks.

My Sumi Smoosh with Vellum tute is below. I've also uploaded YouTube vids: Part 1 and Part 2.

Here is Melly Testa's tute on hand dyeing from her book Inspired to Quilt and here is Jane Lafazio's tute on Needle Felting. Next up: Lyric Kinard and Alisa Burke. I'll have their links up Thursday!

Sumi Smoosh with Vellum let's get to it!

Supply List
White Vellum Paper
Plaste folder, or sheet that you can fold
Inks: 2 colors and a metallic (or what you have on hand)
Spray bottles (1 per color, I use Ranger's Mini-Misters)
   if you don't have the spray bottles you can just drop some ink onto the plastic sheet
Brayer (or just rub your hand over the plastic to move it around)
Water
RUBBER GLOVES!
If desired and at hand:
alcohol
needle and thread
tape

One of my students named this technique and it stuck. Great name: sumi is the Japanese word for ink.

First open up your plastic folder (clear plastic)
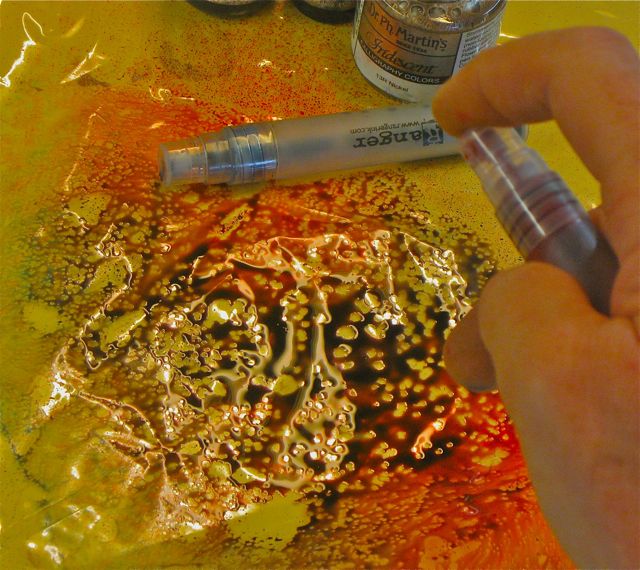
and drop or spray some inks in like so:
Now, close the plastic folder and rub or brayer the ink around, like this
Open up the plastic folder and lay your vellum in on the right hand side, like so:
Close up the plastic and brayer again. Open it, and voila!
There is always plenty of ink left over on the plastic sheets. So do it again. You can make more marks on the paper with stamps by picking up some of the leftover ink. Shown below are roller stamps made with double stick craft foam and wallpaper seam rollers. 
While the ink is wet, and the paper is still on the plastic, try spraying with alcohol or dropping alcohol. That's a neat resist. I love to fold the vellum paper and create a creased pattern that will accept the ink in a different way. You could also crease the vellum after it is dry. You could try other resists as well.
Here: I used one of the pages in my journal. I sewed it in at the top of the page (could have stapled, taped, brad-ed, eyelet-ed, paperclipped). I used a Black Sharpie and a White Sharpie here as well as washi tape from Pretty Tape on Etsy.
Yes, very important to give directions on your journal page, right? Or perhaps, I'd have forgotten ...
Here's a close up of the sewing bit (bottom right)
I hope you will enjoy this simple technique. Let me know if you try it out. I'm looking forward to seeing Melly's and Jane's tutes. There are more coming every day for the rest of the week! Fun, right?

Friday, September 18, 2009

Mixed Media Self Portrait Journal Page

Yet another video! This one is on making a self-portrait journal page using collage, crayon, inks and watercolor.

I wanted to do a follow-up video to Susan Cohen's wonderful self portrait journal pages.

A little story: Some time ago, I was teaching a class of teenage girls and announced that we were going to make self-portraits. Oh, the groans! "No!", was the general outcry. "I don't like to look at my face."

So, OK, I could see this was going to be a battle I didn't want to fight. I suggested that we leave the word "self" out of the mix and just do "portraits." That met with approval and enthusiasm.

So I'll suggest the same to you. Relax. Draw an egg shape or a circle and put a couple of eyes in there, follow up with a nose and a mouth. What color is your favorite shirt? Do you have a pair of earrings that you always reach for?

Kindergarteners have no trouble drawing people. They draw everyone without a care in the world. Play with this as if you are 6 years old (why should they have all the fun?).

Gently let go of the judgements.

Have a great weekend, everyone.